TextMate 2 + rmate = Awesome
CommentsI heard TextMate 2 will be released tomorrow and decided to try it out. One really cool thing that was added to TM2 is the rmate script. This is a nifty little script that will let you edit files on a remote server through your running instance of TextMate 2. Here’s how to get it working using SSH tunneling.
Verify it’s enabled
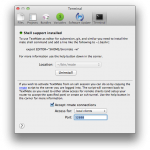
On the current TM2 alpha, the default is to enable rmate for local clients, as shown here. That’s just fine, because we want to encrypt our file editing activity via SSH tunnel, anyway. As far as TextMate’s concerned, our rmate is local.
Just verify that the “Accept rmate connections” checkbox is checked, “Access for” is set to “local clients” and note the port number (52698 be default) or set it to one of your choosing.
Once you’ve done so, click on the “rmate” link in the preference’s descriptive text to open the rmate script in a TextMate window. Copy the script’s contents.
The Tunnel o’ (TextMate 2) Love
If you’re not familiar with SSH tunneling, all you need to know for the purposes of setting this up is that SSH allows you to send your traffic destined for certain ports over the SSH connection to your local machine (possibly to an alternate port). SSH to a server you’d like to edit some files on, using the following command:
ssh -R 52698:localhost:52698 <user>@<server>
Be sure to replace 52698 with the port you chose, if you altered it.
This command says that for the duration of your SSH session, any connections to port 52698 on the remote machine will have their traffic forwarded on to your local machine’s port 52698, where your running TextMate 2 instance will happily accept it.
Copy the rmate script (first time only)
We need to get the script installed on the server. Since you’re already SSHed onto the server, the easiest way to do that is probably just to paste the contents of the script into a new file. Substitute your own editor of (second) choice as appropriate:
# If installing for all users...
sudo vi /usr/local/bin/rmate
# If installing for yourself (make sure it's in your PATH!)...
vi ~/bin/rmate
# Make it executable
chmod +x <previously-used-directory>/rmate
Now, if all went well, you should be able to run:
rmate rmate_rocks.txt
A TextMate window should pop up with a blank file. Type whatever you like into the file (might I suggest “rmate rocks!”) and save it. On the server, your rmate_rocks.txt file will have been saved!
Troubleshooting
/usr/bin/env: ruby: No such file or directory
Your server doesn’t have Ruby installed. The rmate script is written in Ruby, so you’ll need to install a Ruby interpreter.
Warning: remote port forwarding failed for listen port 52698
Someone else is already using port 52698 on the server for something. No big deal. Disconnect from the server, and choose another port:
ssh -R <my-port-number>:localhost:52698 <user>@<server>
Now, when you run rmate, you’ll just need to specify the alternate port, like so:
rmate -p <my-port-number> rmate_rocks.txt
Since the SSH tunneling takes care of forwarding the rmate traffic to 52698 locally, you don’t have to change any setting in the TextMate 2 Terminal preferences!
That’s it!
I’m really excited about TextMate 2, and haven’t gotten to play around with it much yet, but I hope this helps you get started with what I think is one of the coolest new features. Thanks for reading!
[Update 12/14/11: If you want to further simplify your rmate setup, check out Jon Simpson’s writeup on setting up RemoteForward in your SSH configuration file]
comments powered by Disqus